Basic usage
Basic usage
You can send fax from Outlook client in the way similar to sending a regular mail message.
- Create a new message using the File - New - Mail Message.
- Use the To... button to select recipient; unless he is already in your address book, create
a new fax address.
- Enter a Subject.
- Write the text of the message and press the Send button.
- If the "Fax Preview" function is enabled, FaxChange will send you preview of the fax before it
is sent and you can decide whether you wish to send it or not.
- FaxChange sends a message confirming the fax delivery or non-delivery back into Outlook
In case you want to fax from other applications, the fax printer must be installed. Follow these steps:
- create document
- choose command for printing the document and select the "FaxChange Client Printer" as printer.
- if Outlook is not running, dialog box for profile selection appears; select appropriate profile
- new message dialog box appears after a while where you can enter fax recipient and subject and send the message. Converted document will be
enclosed in the message as attachment.
- if fax preview is enabled, you must confirm it.
If you want to fax from Word or Excel and big converter is activated, follow these steps for faxing:
- create a document
- in the File menu choose the Send To - Mail recipient (as Attachment)... command
- if Outlook is not running, profile selection dialog box appears; select appropriate profile
- new message window appears. Enter recipient and subject and send the message. Current document will be enclosed in the message as attachment.
- if you are using a preview, you must confirm it.
If you are faxing for the first time and there is no client printer installed you will be offered to install it.
How to send a fax at certain time
How to set up preview sending
How to set up a coversheet
How to account faxes
back to top of page
How to create a fax address
Fax address can be created in the personal address book in two ways - either press To... button when composing a new message and then choose
New... button or press the New entry button when personal address book is open. Valid address type list box appears in both
cases; select a "FAX" option and enter required data. These include:
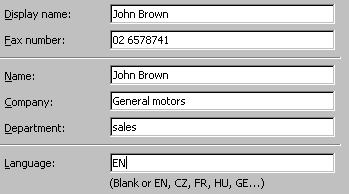 Display name - under this name is address stored in the address book
Fax number - you can enter multiple numbers separated by a semicolon. FaxChange will try to send fax to all these numbers in sequence.
Special symbols:
i - internal call (inside phone exchange)
+ - international code symbol
Name - this name can be added to the coversheet
Company - the item can be added to the coversheet
Department - the item can be added to the coversheet
Language - which language will be used for coversheet. If not filled, FaxChange selects language automatically according the fax number
If you wish to make fax addresse accessible to all users through the Exchange global address list, administrator must
add in Active directory Users and Computers new contact with fax address. Then you can select this fax recipient from the global
address list when composing a new message.
Fax address can be entered directly in format recipient[FAX:number], e.g. John Smith[FAX:02 61388 210]
back to top of page
Faxing from contacts
You can use contacts in the Outlook to send faxes. Enter fax number into the Fax field on the contact form. If you enter multiple fax numbers
separated by semicolons, FaxChange will automatically try to send fax to all entered fax numbers in sequence. When sending fax, you can select
fax address from Outlook Address book, where fax addresses are displayed.
You can't see contacts in the address book?
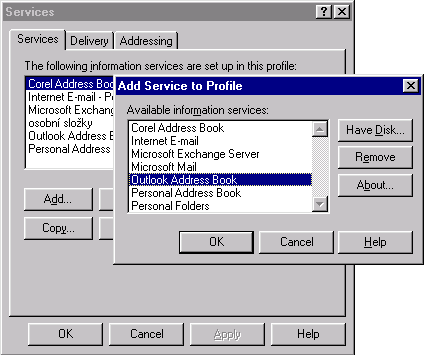 First of all you must set up Outlook to use contacts as address book: Menu "Tools"-> "Services"-> "Add" -> "Outlook address book".
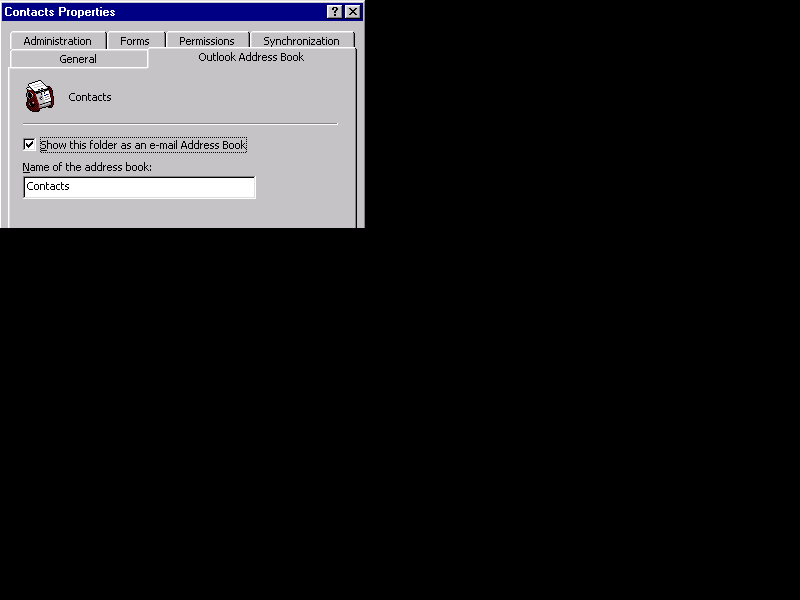 Now it is necessary set up all folders with contacts to be visible in Outlook address book: right-click on the folder, select "Properties"
and on the Outlook Address Book tab check "Show this folder as..." checkbox.
back to top of page
How to receive a fax
Delivered fax is displayed in Outlook client as message with another type of icon. If you open message, form with fax image will be displayed
(you must have support for fax forms installed). You can manipulate fax using toolbar similar to Imaging application. On the "Message" tab are
displayed some technical data (arrival time, fax CSID etc.).
Using toolbar you can change fax display mode, its rotation and size and displayed page (if fax is multi-page). Next you can use functions
for wipeout speckles a correction of skewed image; when forwarding fax, you can do some simple editation (enter text, lines, rubber stamp ...).
During forwarding of edited fax you receive message "Fax was changed, do you want save changes?". Available option:
- Yes - changes will be saved in internal format, so you can recall them (change fax back to original look)
- No - changes will not be saved
- Save as fax - changes will be saved permanently, you can not recall them. Use this option when forwarding message to fax machine
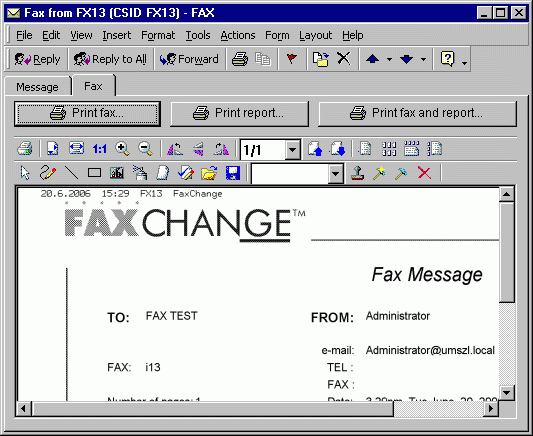
Picture of tab with message.
back to top of page
Fax Preview
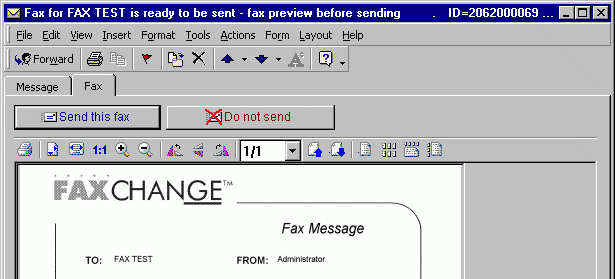
FaxChange allows fax preview before sending. Thus you can check whether the fax looks exactly as you imagined. You will receive this preview
as email message some time after sending fax from Outlook. Form with two buttons will be displayed after opening the preview:
Send this fax - FaxChange will start fax sending after pressing this button.
Do not send - press this button if you don't like the look of the fax and you don't wish to send it. As a result, FaxChange will not
send this fax; no warning will be generated.
If you send faxes from your notebook through a telephone connection, we recommend disable fax preview function
because transmission of preview back to your notebook would be too demanding for the telephone line.
How to set a preview sending for one message
How to set a preview sending for all messages
back to top of page
Delivery/ non delivery confirmation
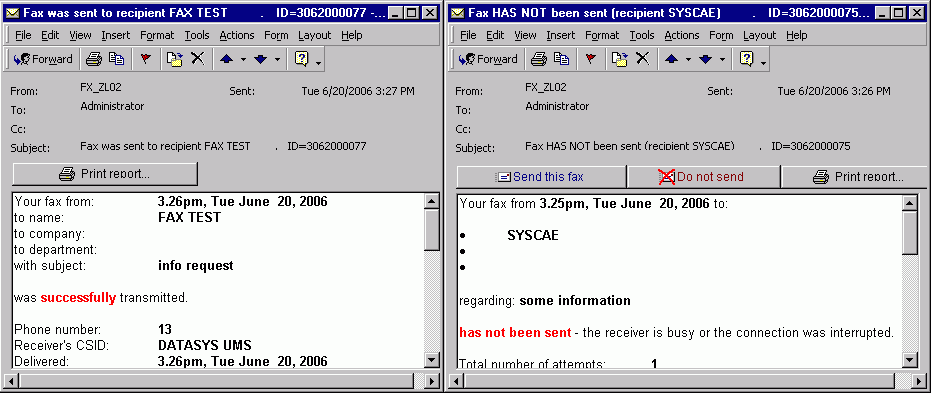
If fax has been delivered to the addressee successfully, sender will receive mail message with form reporting successful delivery and containing some
transmission details (send time, transmission length, target fax CSID etc.). By pressing the Print Report button you can print delivery
confirmation on your printer.
If fax fails to be sent for any reason (busy line, wrong number, line fault) you will receive form with notice that fax wasn't sent. Check if fax
number is correct and use Send this fax button to try to send the fax again. If you press Do not send button, fax will be cancelled.
back to top of page
Other functions
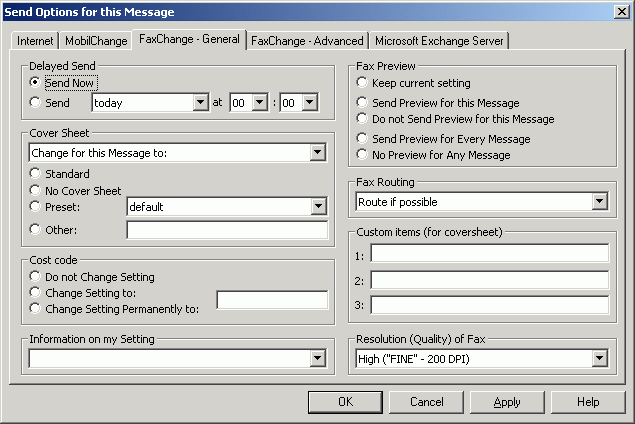
All advanced options are set in message properties - in new message window, select File - Properties menu and press Send Options button. This way
works in Outlook up to XP version.
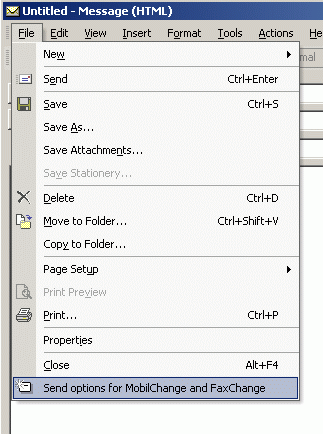
For Outlook XP and 2003 use File menu in new mail window and select "Send options for MobilChange and FaxChange" item.
How to send a fax at certain time
If you wish to send fax at a certain time, follow these steps:
- Choose the File/Properties menu in message window before fax sending
- Press the Send Options button in the Properties dialog box
- Choose the FaxChange - General tab
- Click on the Send radio button in the Delayed Send frame and choose what day and time you wish to send the fax
- Press OK to quit the Send Options dialog box, press OK once more to quit the Properties window
- Send the message.
back to top of page
How to change preview sending for one message
If you wish to change preview sending for one particular message, follow these steps:
- Choose the File/Properties menu before you send the fax
- Press the Send Options button in Properties dialog box.
- Choose the FaxChange - General tab
- In the Fax Preview frame, select whether you wish to receive a preview or not (Send preview for this message / Do not send preview
for this message)
- Press OK to quit the Send Options dialog box, press OK once more to quit the Properties window
- Send the message.
How to set a preview sending for all messages
back to top of page
How to set a preview sending for all messages
Sending of previews is enabled by default after installation. If you wish to change this setting, follow these steps:
- Choose the File/Properties menu before you send the message
- Press the Send Options button in the Properties dialog box
- Choose the FaxChange - General tab
- In the Fax Preview frame, select whether you wish to receive previews permanently or not (Send preview for every message / No preview
for any message)
- Press OK to quit the Send Options dialog box, press OK once more to quit the Properties window
- Send the message.
How to set a preview sending for one message
back to top of page
How to set up a coversheet for one message
By default, every fax gets coversheet, which is assigned to each user in the FxUserM program. If you wish
to use a different coversheet for one particular fax follow, these steps:
- Choose the File/Properties menu before you send the message
- Press the Send Options button in the Properties dialog box
- Choose the FaxChange - General tab
- In the Cover Sheet frame, choose "Change for this message to:" and select coversheet
- Press OK to quit the Send Options dialog box, press OK once more to quit the Properties dialog box
- Send the message
Selection options:
Standard - fax will be sent with the standard coversheet which is set in FxUserM program.
No coversheet - fax will have no coversheet.
Preset - you can select coversheet from the frequently used list.
Other - enter name of the coversheet you wish to use. The coversheet must be installed on the FaxChange server.
How to set up a coversheet for all messages
back to top of page
How to set up a coversheet for all messages
If you wish to change your standard coversheet to another one for all your faxes, follow these steps:
- Choose the File/Properties menu before you send the message
- In the Properties dialog box, press the Send Options button
- Choose the FaxChange - General tab
- In the Cover Sheet frame, choose "Change permanently to:" and select coversheet
- Press OK to quit the Send Options dialog box, press OK once more to quit the Properties dialog box
- Send the message.
How to set up a coversheet for one message
back to top of page
How to get user setting
If you want to discover user setting of the current preview, coversheet, user authorisation, group membership etc., follow these steps:
- Choose the File/Properties menu before you send the message
- Press the Send Options button in the Properties dialog box
- Choose the FaxChange - general tab
- In the Information on my setting combo box choose "Send me info about my current setting"
- Press OK to quit the Send Options dialog box, press OK once more to quit the Properties dialog box
- Send the message.
back to top of page
How to change a costcode
Each fax can be charged according to costcode using the fxCostM program. If you are authorised to change
costcodes, you can set costcode for particular fax in the following way:
- Choose the File/Properties menu before you send the message
- Press the Send Options button in the Properties dialog box
- Choose the FaxChange - General tab
- In the Costcode box, choose one of the options:
Do not Change Setting - fax will be charged according to code entered by administrator in the fxUserM
program. Default setting is All code.
Change setting to: - enter the code that is to be used for charging currently created fax
Change setting permanently to: - enter the code that is to be used for charging all faxes that will be sent from this moment
- Press OK twice and send the message.
back to top of page
How to add additional items to the coversheet
Various information concerning the sender, recipient or fax properties can be written onto coversheet. Besides that, you can use three optional items.
However, the user item 1, 2, 3, must be used on the used coversheet.
To enter the variable contents follow these steps:
- Choose the File/Properties menu before you send the message
- Press the Send Options button in the Properties dialog box
- Choose the FaxChange - General tab
- In the Custom items (for coversheet) box enter required variables for the coversheet
- Press OK twice and send the message.
back to top of page
How to set a fax routing
This setting is applicable if there are several branches in your company connected using LAN/WAN, each branch has its own FaxChange and you are using
faxrouter. Faxrouter detects during sending a long distance fax, whether it is advantageous to send it through the network to one of the branches
first and then send it from there using cheaper phone rate.
In the Send Options dialog box, you can set following options in the Fax Routing box:
Route if possible - the fax will be routed according to faxrouter settings (optimal sending location will be found)
Send this fax locally - the fax will not be routed, it will be sent by your FaxChange server.
back to top of page
Fax address - advanced options
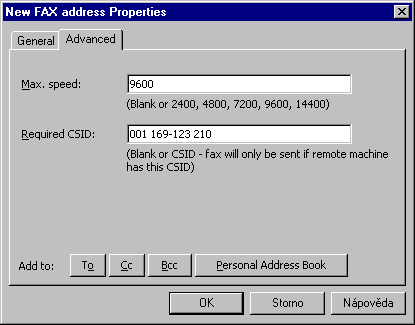 When creating a new fax address, it is possible to configure two parameters.
The first of them is Max. speed for setting the maximum speed for fax sending. Use it for example if fax equipment at the receiver's side
is older technology, and it locks-up and prevent fax from being sent at higher speed. Permitted speeds are 2400, 4800, 7200, 9600 and 14400 bps
(bits per second). If other values are entered, the nearest lower value is used if present. Otherwise speed is not limited.
The second parameter is Required CSID, which increases security - protection of confidential information. If you are going to send fax
to the address with required CSID setting, the fax will not be sent if fax on the receiver's side announces different CSID than you specified.
An empty item indicates any CSID.
back to top of page
Sending faxes with user ID
Prior to sending it is possible change the fax ID (identification) to the relevant ID under which it will be stored in the database.
This ID may be later used for the fax retrieving from the archive.
- Prior to message sending, choose File / Properties
- Press the Send Options button in the Properties dialog box
- Choose the FaxChange - Advanced tab
- Fill Send this fax with custom ID textbox with required ID value.
- Click OK twice and send the message.
back to top of page
Sending faxes with user CSID
To send fax with different CSID than standard follow this procedure:
- Prior to message sending, choose File / Properties
- Press the Send Options button in the Properties dialog box
- Choose the FaxChange - Advanced tab
- Fill Send this fax with CSID textbox with required CSID.
- Click OK twice and send the message.
back to top of page
Integration of paper faxes
This module allows using of common fax device connected to branch telephone exchange for sending of paper faxes via FaxChange;
another reason is central archiving, simple distribution to multi-addressees, and the possibility of expenditure reduction if the organization
uses FaxRouter.
How is PaperFax used?
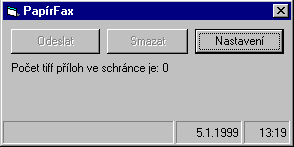
Send fax from standard fax machine to the branch exchange line connected to FaxChange. PaperFax program should be run on any computer
(e.g. secretary's) which waits for originaly paper faxes to send them via FaxChange. If fax for sending is found, it creates standard mail
message including the fax message as attachment. Simply enter the addressee(s) and send fax to FaxChange.
The installation procedure is described in the administrative section of the documentation, section
"Integration of paper faxes".
back to top of page
Scanner module
The scanner module has the same function as a "Integration of paper faxes" module. It works with any installed scanner which uses
TWAIN interface. When you run the program (Faxscan.exe), window with 4 buttons will be displayed:
- Scan - scans the page for the fax
- Fast scan - fast scanning (lower quality)
- Send - sends all scanned pages. New mail message window will be created with attached TIF images. Now fill subject and select
fax recipient(s)
- Delete - deletes all scanned pages, which were not sent
This program uses scanner to gain image of the document, whereas PaperFax uses the fax machine. Resulting
function is identical, it depends on you which equipment is more suitable for you (or already available).
back to top of page


 Display name - under this name is address stored in the address book
 First of all you must set up Outlook to use contacts as address book: Menu "Tools"-> "Services"-> "Add" -> "Outlook address book".
 Now it is necessary set up all folders with contacts to be visible in Outlook address book: right-click on the folder, select "Properties"
and on the Outlook Address Book tab check "Show this folder as..." checkbox.


 When creating a new fax address, it is possible to configure two parameters.