|
Tips, tricks, special functions
|
This section describes some special settings and Faxchange functions.
TR1034 card driver (fxboston) configuration
It is stored in Windows registry under "HKLM\Software\Datasys\FaxChange" key and is valid for fxboston 7.7.1 and higher.
| Key |
Item |
Implicit value |
Description |
| boston\board |
CallingPartyNumber |
|
Implicit caller's number. If not specified, caller's number is not used. |
| boston\config |
DownloadFirmware |
1 |
- 0 - card firmware is not loaded - Boston Host Service is used (recommended)
- 1 - card firmware is loaded by driver
|
| ConvertToGroup3 |
0 |
- 0 - TIFFs are sent as they are
- <>0 - TIFFs are converted into CCITT Fax Group 3 format (required for TruFax cards)
|
| global\timing |
dtmf |
1500 |
Timeout for waiting to every DTMF number in miliseconds. |
line#\system
(# is line number) |
pabx |
0 |
If value is greater than 0, driver will try to receive DTMF signalization of this length after incoming
call answering and use DTMF as identification of called party. Can be set using fxCfg |
Loging settings are described here.
back to top of page
Adding data about sender to the coversheet when using SMTP gateway
If you are using FaxChange with Exchange gateway, Faxchange gets many information about sender from Active Directory, which can be added to
the coversheet. But if you are using FaxChange connected to Exchange through SMTP gateway, these information aren't available. This can be solved
since Faxchange version 6.6.20. Use these directions:
- install FaxChange with SMTP gateway
- run
FaxChange\i386\components\CTLCheck\setup\setup.exe from installation CD - Search server and Ctlcheck will be installed
based on entered parameters.
Installation can be done also manually:
- install Search server, which will take information from Active directory:
- start command prompt, go to Program Files\Common Files\Datasys\DsCssSrv folder
- if Exchange runs on different server, enter
DsCssSrv.exe -iusr -usr%user% -pwd%pwd% -sdnUMS.Search command
If it runs on local server, enter DsCssSrv.exe -i -usr%user% -pwd%pwd% -sdnUMS.Search
Change %user% by FaxChange service account, %pwd% by its password
- import Faxchange\etc\registry\searchsrv-ex.reg file into registry - it creates settings valid for Exchange provider, or
Faxchange\etc\registry\searchsrv-ldap.reg - valid for Active Directory using LDAP provider.
- configure Search server - more info available here.
Especially you must correctly set mailbox used for connection to Exchange (service account must have access to this mailbox)
and parameters for number normalization. Then you can start the service.
- set registry value HKLM/Software/Datasys/Faxchange/global/server/ctl2_extension = 1 (create it if doesn't exist - use REG_SZ type)
- enter configuration for CtlCheck tool in the registry:
[HKLM\SOFTWARE\Datasys\FaxChange\extension\Ctlcheck]
CssName=ZL02	; Search server computer name
CssSet=GAL	; name of set where Search server looks for user data
[HKLM\SOFTWARE\Datasys\FaxChange\log]
filelog=1/0	; log/ do not log into FaxChange.CtlCheck.RRMMDD.txt file
[HKLM\SOFTWARE\Datasys\FaxChange\log\loglevel]
Ctlcheck=0-6	; loging level
[HKLM\SOFTWARE\Datasys\FaxChange\log\system]
dir=C:\Faxchange\log	; folder where log is written to. If empty, log is not created.
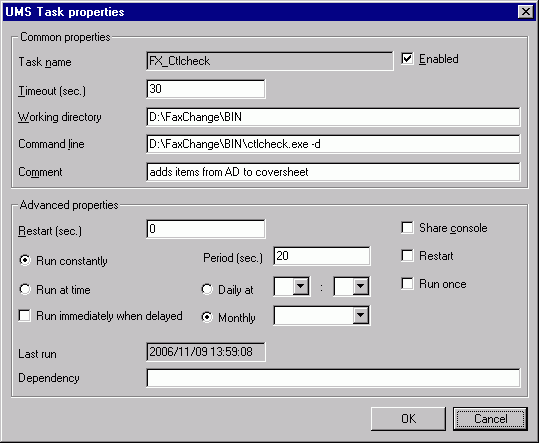
- create task for running CtlCheck tool using umsTaskCfg
according the picture. Tool is located in FaxChange\i386\components\CTLCheck\bin folder on installation CD.
Function: Search server reads information about users and stores them into database. When user sends a fax, it is delivered into mail/in
folder as several files, one of them has CTL extension. CtlCheck reads this file and using sender's address finds all available data about user
and writes them into CTL file. At the end it renames file to CTL2, what moves fax to FaxChange server.
back to top of page
Active Directory database settings for Exchange 2000/2003
If Faxchange takes users from Active Directory, you can set or change list of "enabled" containers (AD containers, where reside
users "visible" for Faxchange) after installation in the registry. Values related to this are located
under [HKLM\SOFTWARE\Datasys\Faxchange\install\exchange] key and they are of REG_SZ type.
| domains |
AD domain list, separated by ';' character. Provider tries to find all subdomains automatically;
if any is not found, you can enter it explicitly here. |
| org_units |
path (and name) to file with list of organizational units (OU), which users are visible for Faxchange.
If not present, all found OU are read including default containers CN=Users and CN=Microsoft Exchange System Objects
(they don't have to be entered). If value is present, users are read from specified OU and from default containers
CN=Users and CN=Microsoft Exchange System Objects.
For every OU you must specify full LDAP path like LDAP://OU=Unit 1,DC=ds-ums,DC=cz (see picture - Unit 1 container).
OU are searched recursively, so if you want read LDAP://OU=SubUnit,OU=Unit 2,DC=ds-ums,DC=cz, you must put into file
also LDAP://OU=Unit 2,DC=ums-cz,DC=cz.
There is one organizational unit specified on every line in the file.

Examples:
- org_units value doesn't exist - Faxchange "can see" all users - from Unit1, Unit 2, SubUnit, Unit 3, Users and
Microsoft Exchange System Objects.
- org_units value exists and links to empty file - Faxchange "can see" users from Microsoft Exchange System Objects
and Users.
- org_units value exists and links to file with LDAP://OU=Unit 2,DC=ds-ums,DC=cz line
- Faxchange "can see" users from Microsoft Exchange System Objects, Users and Unit 2. (ATTENTION - users from SubUnit
aren't visible!)
|
| ProviderDebug, LogPath |
debug settings, read here |
| server |
Exchange server name |
| ldapEmailProperty |
AD property name containing user's email address ("mail" by standard (do not change), if missing - "legacyExchangeDN") |
| ldapEmailType |
email address type (empty by standard (do not change), if missing - "EX:") |
back to top of page
Caller's number and identification for outgoing faxes can be set according sender's PABX
When user is sending fax through Faxchange, on the fax display you can see fax sender identification set to CSID from sending line
configuration. If you are using inbound routing according PABX, some drivers (Brooktrout
TR1034 and CAPI ISDN) can automaticaly set caller's number and fax sender identification to sender's private fax number. Settings can be found under
HKLM/Software/Datasys/Faxchange/global/server registry key:
calling_party_prefix - common PABX prefix of all users
calling_party_mode - 0 = function is off (default state);
1 = set only caller's number (ISDN calling party) = calling_party_prefix + PABX of the user set in
fxUserM (it helps to bill sent faxes to correct users based on real tarification directly
in PBX). On the fax you will see CSID from sending line configuration.
2 = set both caller's number (ISDN calling party) and fax sender identification = calling_party_prefix + PABX of the user set in
fxUserM. On the fax you will see CSID = calling_party_prefix + PABX of the user.
i.e. use calling_party_prefix + user's PABX.
Example: user has PABX = 135, calling_party_prefix is set to 225308. When user sends a fax, recipient see fax sender's identification
225308135. If he sends response fax to this number, it will be delivered to original recipient.
If user hasn't PABX set, CSID from configuration will be used for caller's identification.
Note: this function also depends on connection type between faxcard and PBX and configuration of PBX; caller's number setting
usually works on PRI and BRI line.
back to top of page
(Non)delivery report modification
Normaly (non)delivery report doesn't contain fax TIF image and it is sent to the fax sender. You can change it by appropriate
setting, which is stored under HKLM/Software/Datasys/Faxchange/global/server registry key.
- Inserting fax image into DR/NDR: default setting TIFinDR = 0 - do not send TIF image in DR/NDR; if you set 1
here, fax TIF will be attached to (non)delivery reports.
- Send DR/NDR to user other than fax sender: default setting DRtoFixAddress = 0 - send DR/NDR to original (real) fax sender.
Set 1 here and DR/NDR will be sent to the user specified by these values:
DRto_Name = user name (e.g. "DR archive")
DRto_Email = user address (e.g. "DRarchive@yourfirm.com")
DRto_Gate = gateway of the user (e.g. e - Exchange; depends on your mail system)
DRto_Lang = DR/NDR language (e.g. UK). If any value is missing, it will be taken from real fax sender.
- Copy of DR/NDR WITHOUT fax TIF can be also sent to other address together with original fax sender (or user from DRto_Email).
Configuration:
monitor_email = address, where copy of all DR/NDR will be sent to (e.g. "allDR@yourfirm.com")
monitor_language = DR/NDR language (e.g. FR). Default value is UK.
back to top of page
Running user script during fax printing
Faxchange allows to print incoming faxes (globally all faxes or only for specific users). If specific fax is being printed,
user script can be run also, which do any action (send a message, play a sound...). By this way you can extend
Faxchange features from version 6.0.31 nearly without limits.
How to do it: in the registry editor go to the HKLM\SOFTWARE\Datasys\FaxChange\utils\fxprint branch.
Here you can create text values in form:
- <PABX>print = path to script (runs the script, if fax incoming to specified PABX is printed)
- <LINE>line = path to script (runs the script, if fax incoming by specified LINE is printed)
For both PABX and LINE you can specify concrete number, which can contain * as replacement for group of numbers (asterisk
convention). Script is sent 3 parameters in this sequence: PABX/LINE, printer name (where fax will be printed to) and fax CSID.
Examples:
*print = c:\faxchange\script\hraj.cmd - runs hraj.cmd script for fax with any PABX.
3*print = c:\faxchange\script\send.cmd - runs send.cmd script for faxes whose PABX starts with 3.
4line = c:\faxchange\script\line.cmd - runs line.cmd script for faxes received by line 4.
Send.cmd script example (sends a message to computer PCNovak with fax information):
NET SEND PCNovak "New fax: PABX: %1 printer: %2 CSID: %3"
If fax conforms to more registry values, script from every value is run. If fax conforms to any value, but it will not be printed
(e.g. global printing is off and printing for user is not set), script will not be run.
back to top of page
Sending information about error files
When Faxchange is not able to process incoming fax or email (for example gateway receives email with no fax
number), administrator is sent email with problem description. If you don't want to receive these
emails, you can disable them by registry setting:
HKEY_LOCAL_MACHINE\SOFTWARE\Datasys\FaxChange\global\admin\SendErrFiles = "0"
Sets whether to send emails to administrator or not (default "1" = send)
HKEY_LOCAL_MACHINE\SOFTWARE\Datasys\FaxChange\global\exsp\SendErrFiles = "0"
Sets whether to send emails to external administrator or not (default "0" = do not send)
back to top of page
Class2 modem problems
Your FaxChange Class 2 driver's proper operation relies on your faxmodem being correctly
connected and fully compatible with the Class 2 / 2.0 standard. Surprisingly big number of
faxmodems allows faxing according to the Class 1 standard only. This applies also for
"would-be" brand faxmodems (e.g. MicroCom Office Porte). If you fail to get your
faxmodem to operate try the following test. Connect to your modem using any terminal
program (e.g. HyperTerminal supplied along with Windows NT4 or Windows 95) and enter the following commands:
AT
AT+FCLASS=1
AT+FCLASS=2
AT+FCLASS=2.0
Your modem's response should be OK in all three events. If
your modem doesn't answer to the first command there is a connection error (e.g. you
specified a wrong port). The other three commands test the possibility to work in the
Class 1, 2 and 2.0 mode, respectively. The OK response means that your faxmodem can work
in the specified mode, an ERROR message means the contrary. Alternatively, enter the
following commands:
AT
AT+FCLASS=?
Your modem will directly display which fax modes it supports.
If you are sending a fax and the modem initiates the line, dials no number and hangs up
after a while it means that you specified a wrong line type for a particular modem (PABX /
public). For a PABX line, an ATX3 command is executed to activate the line and then the
modem waits for a dialling tone; for a public line, an ATX1 command is executed and the
modem dials immediately after the line has been activated.
back to top of page
Accelerating the import of bigger number of users into the database
If you wish to import a bigger number of users into the database this operation will take
a relatively long time. If you quit the FaxChange.Server and FaxChange.SysAtt services
before running the FxUserM all the database operations will become considerably faster.
back to top of page
Fax routing into the public folder
The routing of incoming faxes into the public folder is advisable when you are using a
service routing (all faxes are sent to the operator who distributes them). In case an
operator is not present, faxes will remain in his mailbox and nobody will be able to
access them because the service routing cannot be set to multiple operators. The solution
is to deliver faxes into the public folder which is accessible by more users - so there
will always be somebody able to process the incoming faxes.
 Setting procedure:
- Run MS Exchange client / MS Outlook
- Create a required public folder, e.g. faxes
- Run Exchange System Manager
- Find the above mentioned public folder, uncheck the "hide from address book"
option in the Properties-Advanced
- If you have selected Exchange directory user database during setup, check whether you have public
folder displaying switched on by KBFX19990428-165150BRO
and skip the 7th point
- Run FaxChange UserManager
- Synchronize the user database. Make sure you choose the "Export also distribution lists
and custom recipients"
- Set the received fax routing (i.e. 0 to x lines) to the faxes user
(it has the "DL" icon). You must enter only line number in setting dialog, not its name (Line0 to x)!!
- Terminate fxUserM
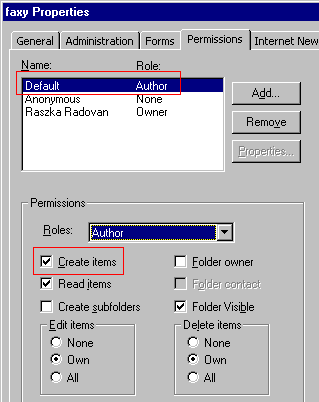
WARNING!! To deliver faxes into public folder correctly, you must set at least Create items right to the Default user!
Normally is this right set - see picture. You can set rights to other users according your demands.
back to top of page
Generating the information strip for outgoing faxes - Class2 driver
Each fax has the information strip (line) in the header of every page containing details about fax
such as sender's and receiver's phone number and number of fax pages.
This strip is fully adjustable. You can set font and content of the strip.
The Font is stored in the registry in the HKLM/Software/Datasys/Faxchange/global/system/class2font
value. Enter name of one of the files located in the \Faxchange\bin\cls2fnt directory here.
The Strip text for faxes sent by the Class2 modem is stored in the /global/system/class2title registry
key. The strip is specified by parameters, the following variables are valid:
- FROMCSID - sending line CSID
- TONUMBER - number that is being called
- DATETIME - date and time in the international format (YYYY/MM/DD HH:MM)
- PGNO - current page number
- PGTOTAL - total pages
You can insert variable in one of the three ways:
- %variable% - just inserts a variable; prints out as many characters as much text it contains
- %variable#width% - aligns the variable to the specified character number from the right
(i.e. adds spaces behind it). If the variable is longer it will be cut.
- %variable# -width% - aligns the variable to the specified character number from the left
(i.e. potentially inserted spaces will come first and then the variable text). If the
variable is longer it will be cut.
A total of 95 characters are available for the whole strip.
ATTENTION - stripe is not visible in preview, only on the fax at the recipient's side !
back to top of page
Generating the information strip for outgoing faxes - Brooktrout driver
The same information are valid for creating strip on the Brooktrout TR114 cards as for
Class 2 modems, additionaly you can generate also footer. Font can be changed in this way
and stripe text is written at two places:
- HKLM/Software/Datasys/Faxchange/global/system/bttitle (header) or btfooter (footer) - from this location are taken information
during BT TR114 card reconfiguration, new lines adding etc.
- HKLM/Software/Datasys/Faxchange/lineX/brooktrout/header_format (header) or footer_format (footer) - here is located stripe text
for every line (so lineX means line0, line1 ... until number of your lines).
For TR10xx cards is header content stored in HKLM/Software/Datasys/Faxchange/boston/system/header value, footer is not supported.
Total length of text for Brooktrout strip is 128 characters and you can use these variables:
fromcsid     sender's CSID (our own)
tocsid       receiver's CSID
a            day of week abbreviation (in english)
A            day of week
d            day of month, 01-31
Nf           switch to font #x (applications can combine fonts of the same height)
H            hour, 00-23
I            hour, 01-12
m            month, 01-12
M            minute, 00-59
p            AM/PM
nP           page number, 01-99 (space is used instead of left zero)
                 Optional "n" resets page numbering.
                 If header and footer are used together,
                 "n" in header changes also "n" in footer.
S            seconds, 00-59
y            year, 00-99
%            "%" character
N^           inserts N empty fax lines before header/footer
N_           inserts N empty fax lines after header/footer
Variables are inserted in form %variable, what is different from Class 2 driver. There is no possibility for additional
formatting.
Example: "%d.%m.%y %H:%M:%S From:
%fromcsid To: %tocsid Page %P"
ATTENTION - stripe is not visible in preview, only on the fax at the recipient's side !
back to top of page
Generating the information strip for outgoing faxes - CAPI
Also CAPI drivers can generate information stripe in fax header (not in footer) - stripe text is stored in registry value
HKLM\SOFTWARE\Datasys\UMS\drivers\vxcapi\drivers\header. You can not use any variables nor change look in any way, but driver
itself generates into stripe date, time, CSID and page number. See picture - red frame contains text from header value.

ATTENTION - stripe is not visible in preview, only on the fax at the recipient's side !
back to top of page
