 The FX Admin database is used for administration of users in Lotus Notes.
If you are not sure, what is "user group", "fax routing" etc., read Introduction into Faxchange administration.
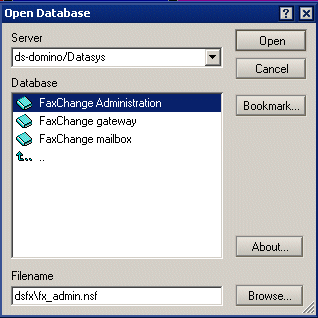
Connection to the server
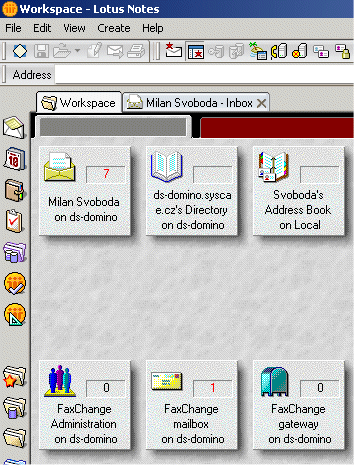
After starting Lotus Notes you must find database for user administration on server.
Select server, where database is located, from list of available servers on the top of window, then select database
location.
Press the "Open" button to open FX Admin database on your workspace in Lotus Notes. |
|
 |
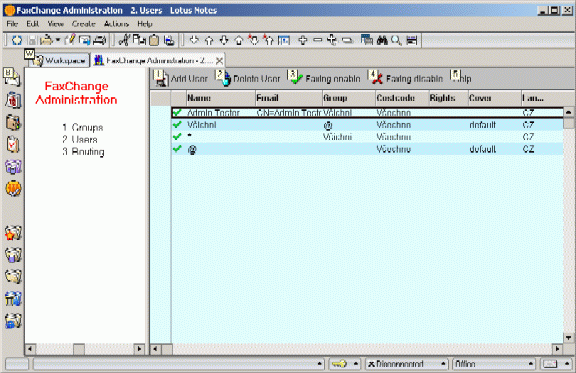
FX Admin main window
Main windows have 3 parts. Menu for switching views is in left side window.
- Groups
- Users
- Routing
On the right top is available menu which depends on the selected view.
On the right down is data view showing records of selected type. |
|
Editing users
List od users is displayed when you select "Users" option from left side menu.
User can be edited after doubleclick or pressing [Ctrl+E] keys on the selected user.
Displayed columns
List contains these columns: Name, Email, Group, Costcode, Rights, Cover, Language.
Items in the Rights column are displayed in abbreviated form using the following letters:
h ... high priority
l ... low priority
n ... normal priority
s ... scheduled faxes
i ... calls within the exchange enabled
o ... calls outside the exchange enabled
c ... long distance calls
s ... international calls
If user or group has particular authorization, a letter will be displayed, otherwise dash will be displayed.
Rights are displayed in their effective value, i.e. if a record is set to "default" setting from group or from default group
will be displayed.
Sorting
Records can be sorted according to Name column by clicking the mouse on a column header.
Upper menu
Add User
Shows dialog for creating a new user - select user from Lotus Notes directory and set parameters acording your needs.
Dialog for user creation is the same as for existing record editing. It contains these tabs:
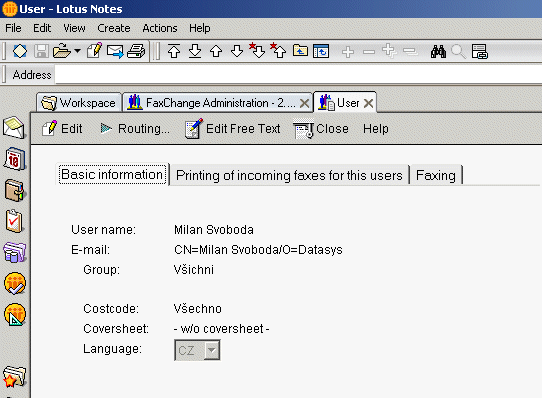
- Basic information
User/Group name - name of the user or group based on the record type. The value is only for your information, it cannot be changed.
E-mail - e-mail address of the user (missing for groups). The entry cannot be changed.
Group - name of group to which user belongs (missing for groups). You can select one of the existing groups from list.
Costcode - preset accounting group for this user. You can select it from the list or enter a new value.
Coversheet - preset coversheet (a fax cover page) for this user (filename). You can select value from list of existing coversheets
or enter a new value. Coversheets are stored in the subfolders under /faxchange/data/cover.
Content of subfolder has no effect to this coverpage list - new items must be added manually.
Language - select which language Faxchange uses for comunication with this user.
- Printing of incoming faxes for this user
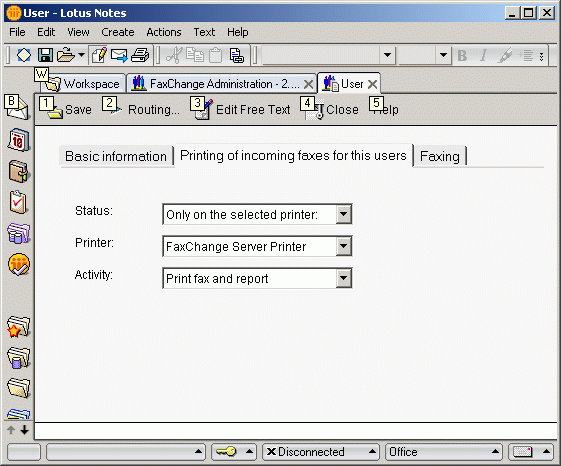 Setting how incoming faxes for this user will be printed (missing for groups). FaxChange allows printing of received faxes and reports.
This feature can be customized for each recipient.
Setting how incoming faxes for this user will be printed (missing for groups). FaxChange allows printing of received faxes and reports.
This feature can be customized for each recipient.
In Status filed select how fax wuill printed. Options:
- Default settings - settings from fxCfg are valid (so if printing is off there, nothing will be printed)
- Only on the selected printer - printing occurs on the selected printer only, see next.
- Default setting and on the next printer - printing according to the fxCfg settings and on the another selected printer also.
In Printer field select user printer, where print jobs will be directed to.
Activity field sets what data will be printed - faxes, reports, both or nothing.
- Faxing
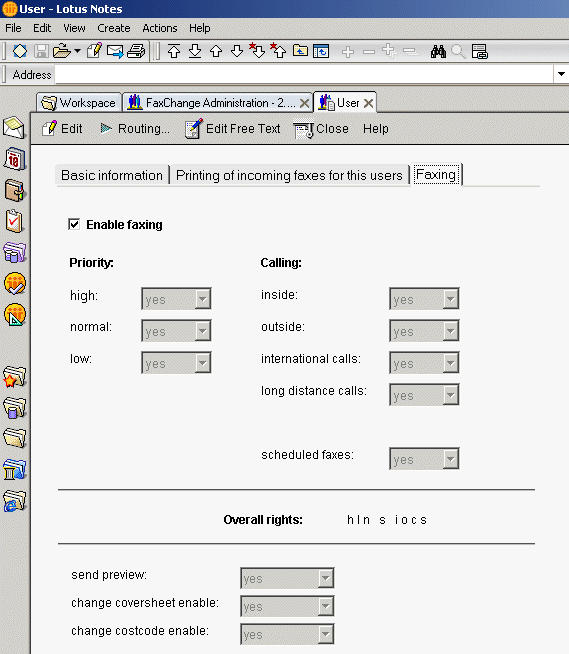 Enable faxing - specifies whether user (group of users) is authorized to send faxes. If it is checked, you can set rights.
Priority: high, normal, low.
Calling:
- inside - within the exchange
- outside - outside the exchange
- international calls - international faxes
- long distance calls - long distance faxes
- scheduled faxes: sending delayed for a later time.
Each option can have together with yes/no values also "default" value, which means that value will be taken from group to
which user belongs in case of users, or from default group in case of groups.
Overall rights: shows an effective setting of rights, i.e. it fills items that are set to default with values
from group or from default group.
send preview: you can select whether this user should receive previews before fax is sent or not. Before user
sends fax he can set whether he wants to receive preview or not regardless of setting in FX Admin.
change coversheet enable: if user has this right he can select coversheet other than that one preset by administrator
before he sends fax.
change costcode enable: user with this right is allowed to change costcode for fax being sent.
Upper menu during record editing:
Edit - starts record editing.
Save - saves record changes.
Routing shows list of routing rules valid for this user. See Editing routing.
Edit Free Text - reserved for future use, here you will configure new functions. At this time, setting of fax
printing for this user is stored here.
Close - closes current record.
Help - shows help.
Delete User
Deletes selected user. Before this displays confirmation dialog.
Faxing enable
User will be authorized to send faxes. It will be indicated by the green mark icon before user name.
This can also be called up by checking Enable Faxing option in specific user properties on Faxing tab.
Faxing disable
User will not be authorized to send faxes. It will be indicated by the red crossing icon before user name.
This can also be called up by unchecking Enable Faxing option in specific user properties on Faxing tab.
If user tries to send fax, he will receive mail message with warning that he has no permission to send faxes.
back to top of page
Editing groups
Use Groups option in left side menu to switch to group list. Group can be edited using doubleclick or [Ctrl+E] keys.
Add Group
New group with setting from @ group will be created after entering its name.
Delete Group
Selected groups will be deleted after confirming the action. If this group had any users, you must move them to @ default group
or to any other existing group.
back to top of page
Editing routing
List of all routing rules (rules for routing of delivered faxes) will be displayed when Routing is selected from the menu.
Rule type is given by dropdown option.
What is routing for?
Incoming faxes must be distributed to individual users - at best to those to whom they
belong. A proper routing can be set on the "Routing" view in the administration database.
Faxes in FaxChange can be divided according to three criteria:
- PABX. If your exchange allows a dialing prefix and
"virtual fax numbers" it will pass the telephone number that is currently
being called to the fax server. For example, one user can have a telephone number 4444100,
another one 4444101, the third one 4444102; however, calling to any of these numbers will
ring on one physical line of the fax card and the exchange will pass the last three digits
of the telephone number to the fax card. In the user manager, set the PABX routing for
each virtual line to its owner.
- CSID. CSID is the identification number of an incoming fax. If
you want all faxes from DSID +420 2 421442 to be automatically passed to the XY user, set CSID routing for this
user. You can specify to which sender this CSID belongs in the "comment" item (sender name will be added to From:
field of the received message)
- Line. Also called Service routing. If no PABX or CSID are
available for delivered fax, it is distributed according to the physical fax line
number through which it has arrived. Service routing is usually directed to the secretary who
redistributes received faxes.
The faxserver first tries to route the fax according to the CSID then the PABX and lastly according to the line number.
If it cannot find a corresponding record (if there is no routing set) then fax will be sent to the fax administrator.
Priority of routing can be changed, for more information see KBFX19990421-122653BRO.
Columns
List contains the following columns: routing type, number, description, owner (to whom fax will be delivered according to this rule).
Sorting
Click the left mouse button on Name column header to sort list according to this criteria.
Upper menu
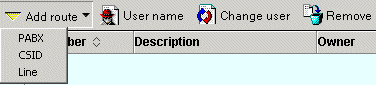 Add route - shows menu for new rule creation of specified type.
User name - shows owner of the selected rule.
Change user - allows to select new owner of this rule from the list of users/distribution lists.
Remove - removes all selected rules from database after confirmation.
back to top of page

