|
HP Digital Sender support
|
HP Digital Sender enables substantial reduction of the time
spent on faxing hard copies of documents by automatic scanning the text,
optimising type and size of the transferred file according to
the document type and forwarding the faxes to the FaxChange software
for delivery to the given addresses.
HP Digital Sender enables sending faxes under the name of the particular user
or under the name of the user defined as operator for FaxChange Digital Sender.
In such case the user must be configured both in the software for HP
Digital Sender, and in FaxChange. The operator's name will be used for sending
faxes without sender details in the header or with a sender unknown to
FaxChange Digital Sender or to HP
Digital Sender. For further details about these settings see
the Configuration section below.
Contents:
SW components must be installed locally on the server where the FaxChange
server has been installed. The installation procedure consists of the
following steps:
- HPDS Service Installation -
Installation of drivers for HP 9100C Digital Sender will result in
the installation of software and services for the Administration of
HW HP Digital Sender on the server (HP JetAdmin Utilities and HP 9100C
software).
- FX Support Installation -
Installation of SW FaxChange for the support of HP Digital Sender
is a component enabling automatic
document retrieval from HP Digital Sender in FaxChange, and
subsequent delivery of those documents to the given addresses.
- Configuration
- Operation of HP Digital Sender
back to top of page
HPDS Service Installation
Installation of drivers for HP 9100C Digital Sender
is executed from the manufacturer CD-ROM supplied together with the
HP Digital Sender. Follow the installation instructions step by step.
In the case of problems refer to the documentation supplied
together with the hardware by Hewlett-Packard.
- Execute the
setup.exe program from the CD root directory
(for example F:\SETUP.EXE).
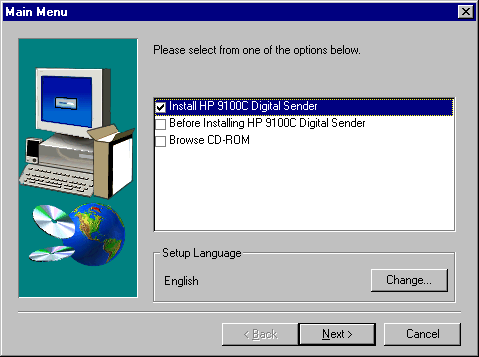
- Select – Install HP9100C Digital Sender and then select
the appropriate language (for example ENG) -
(picture) and click on Next.
- Close the open programs and click on Next.
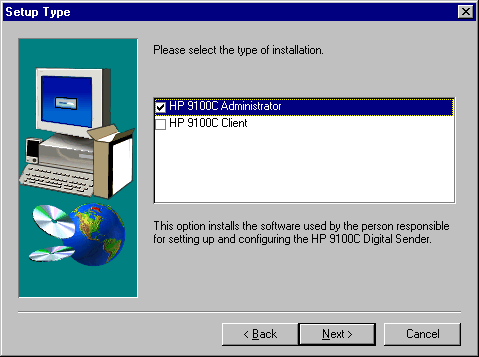
- Select the installation type (on the Administrator server) and
click on Next (picture).
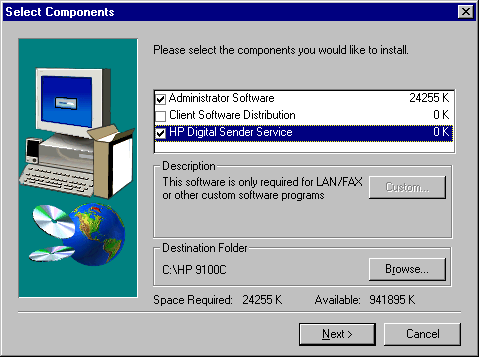
- Component selection (picture).
It is recommended to select the first and the last option
(it is also possible to select all options together), i.e.
Administrator Software and HP Digital Sender Service
and then select the installation directory.
The following steps of the installation procedure are
implicit in the Hewlett-Packard program
with only the most important steps highlighted.
Potential problems should be solved with the help of
the "Help" section of the program.
- If all data have been set correctly, click on Next.
- Read the licence agreement and confirm with Yes.
- Confirm the creation of the directory for
execution of the JetAdmin administration tools.
- For end of installation click on "Finish".
- If the Acrobat Reader 3.01 software has not been pre-installed,
automatic installation will be performed at this stage.
The installation is so simple that it does not require
a more detailed account here.
The documentation can be found on the Adobe web site.
- Confirm the Service Software Requirements with Yes.
- When the installation utility asks you whether
you require "Add Fax service functionality", reply YES
(picture).
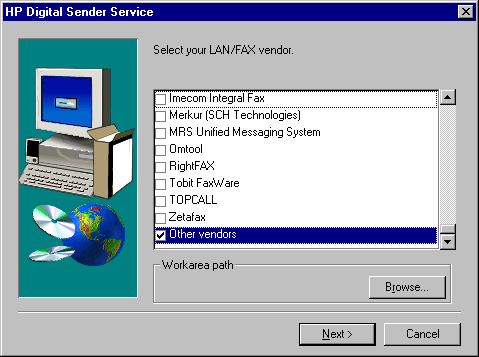
- For HP Digital Sender Service your "LAN/FAX Vendor" must be set.
This step includes selection of the item "Other vendors" at the end of the list,
creation of the HPFSCAN folder in the directory where your FaxChange is installed
(for example d:\faxchange\hpfscan), and its
path setting into "Workarea path", as can be seen in the picture.
- Enter user name and password to be used for starting the
Digital Sender Service on Windows NT. The user must hold
the rights to log as a service and to write into
the created folder. Administrator is usually used here.
- For verification of the service user rights
for the created directory (for example d:\faxchange\hpfscan) click on OK.
- If you want to use this service
as a distribution mechanism as well (see the selection at the
beginning of the installation), set the path to the directory which is to be used by
this service. The default setting can be accepted.
- Now you will be invited to read the readme file and
to perform the registration.
- Restart the operating system at the end of the installation.
Close all other opened applications and accept
the invitation to restart by clicking on "Finish".
back to top of page
FX Support Installation
The installation of the FaxChange SW for the support of HP Digital Sender
is on the installation CD in the support\FaxChange\HP_Digital_Sender_Support\setup\ folder.
- Execute DSSetup.exe (or setup.exe)
- Execute your mail client (MS Outlook), following the invitation of the installation utility,
and click on Next. The same client must be used for connection to the MS Exchange server used by FaxChange.
The connection must be based on an account with administrator rights
and must not be disconnected before the end of the installation
for the connection will be used by the installation utility.
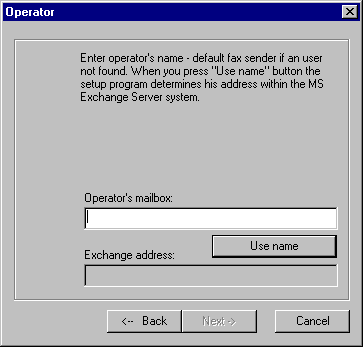
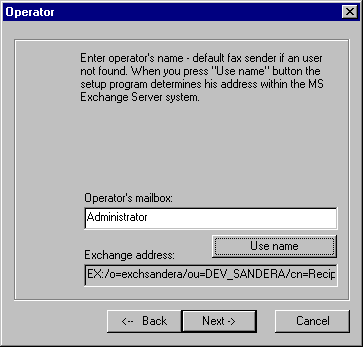
- Enter the operator name to be used as default sender in the case of missing or
unknown user name (this user must be known to MS Exchange Server) and click on "User name" to verify it
(before and after).
Then click on Next.
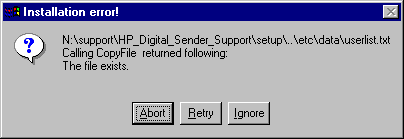
- In the case of reinstallation the installation utility may
warn you that it is unable to create the userlist.txt file
(picture). In such case click on "Ignore" for continued installation
and preservation of the modified userlist.txt file. It is recommended, however, to backup
this file before planned re-installation.
- After finishing the installation click on "Finish".
back to top of page
Configuration
Setting HP Address Book
For proper functioning it is necessary to configure JetAdmin and
Utility HP 9100C. Execution of their program utilities
is possible using Start/Programs/HP 9100C and Start/Programs/HP JetAdmin Utilities.
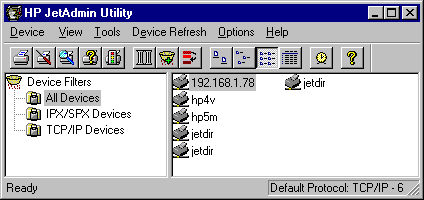
Setting JetAdmin Utilities
From Start/Programs/HP JetAdmin Utilities execute the utility
HP JetAdmin Utility. Check whether the HP Digital Sender
is known under its Name or its IP address (see: picture),
or create it as a new device. The HP JetAdmin Utilities documentation
is accessible as part of the software on the CD supplied
by Hewlett-Packard.
|
|
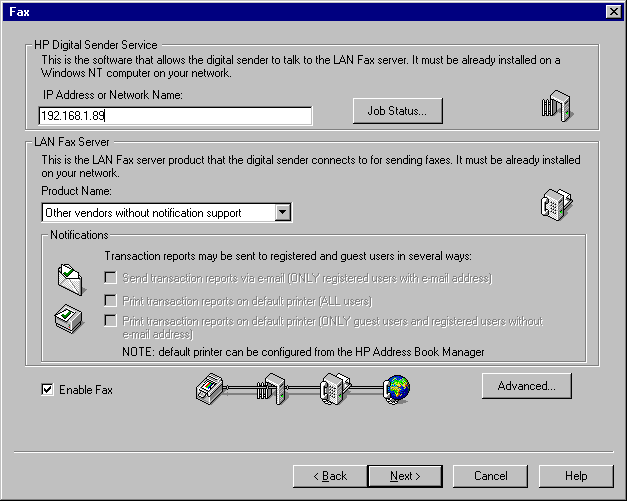
From Start/Programs/HP JetAdmin Utilities execute the program
HP JetAdmin Utility. From the menu select
Device/Modify... and check correct
configuration of the device for your network.
Check correct setting of the "IP Address or Network Name" item for
"HP Digital Sender Service", which is the IP address
or name of the computer where
the service for HP Digital Sender is installed.
|
|
Setting userlist.txt File
If you do not wish faxes to be sent with
the operator as the sender (see Installation), but under the name of
the particular user, use the following procedure:
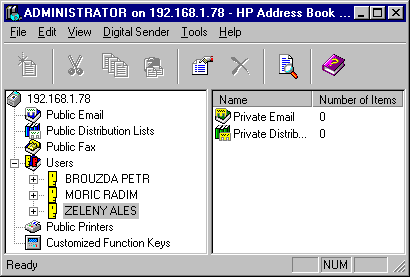
- Enter the users' names into HP Address Book Manager (
Start/Programs/HP 9100C/HP Address Book Manager - see picture)
- Edit the \FaxChange\DATA\hpds\userlist.txt file to contain data in the
user_id;name;email;smpt_email
format - where smtp_email need not be defined.
For example:
HP_SCANNER-SANDERA ROMAN;Roman Sandera;EX:/O=EXCHSANDERA/OU=DEV_SANDERA/CN=RECIPIENTS/CN=A;A@DEV_SANDERA.exchsandera.com
sample.
The following is the principle governing the userlist.txt file use.
Enter the addressee's phone number first when sending a fax.
Then enter the sender name into the field Notify if you wish.
This user must be known to the HP Digital Sender
(see JetAdmin Utilities Setting) and to FaxChange
(Userlist.txt File Setting).
In such case the addressee will receive the fax
with the name of the particular user - sender.
If either of the above conditions is not fulfilled
then the addressee will receive his fax with the name
of the user defined as operator at installation.
The delivery confirmation will be sent
to the mailbox of the user under whose name the fax was sent.
If the user - sender has been entered correctly
the delivery confirmation will be sent to
the mailbox of that user. If the user has not been defined
or has been unknown, the confirmation will be sent to
the operator's mailbox.
back to top of page
HP Digital Sender Operation
After completion of the installation and the necessary configurations
the server restart must be performed for correct
initialisation of all installed services and re-load of registry.
HP Digital Sender enables faxing hard copies of documents by the following:
after entering the addressee's phone number, and possibly the user - sender's name,
into the "Notify" field the device will automatically scan the
original document for sending and will forward it automatically
to SW FaxChange for delivery to the given phone number (or numbers).
HP Digital Sender enables fax sending under a particular user name
or under the name of the user defined for the purpose of the
FaxChange Digital Sender as the operator.
back to top of page
